Toilet bolt caps are the coverings on the bolts that hold your toilet to the flange. If you want to fix a leak or replace a toilet unit, you’ll have to remove the toilet bolt caps to access the bolts.
Unfortunately, the operation may not be easy because the caps have no handles. They aren’t easy to grip and obviously won’t come off by themselves.
If you’re planning to remove your toilet bolt cups to fix something or replace your old toilet, it’s important you understand how the caps are installed in the first place.
Read on to learn a few tricks on toilet bolt caps removal process.
When to Replace Toilet Bolt Caps
It is important that you know toilet bolt caps removal process and when you need to remove the old ones. Here are a few reasons to replace your old toilet bolt caps:
Bolt Caps Disappeared
Bolt caps can disappear from your toilet bowl after years of regular use.
Damaged Bolt Caps
When you notice that bolt caps are damaged and are no longer securely held, you may need to remove and replace them. If the caps become loose, they may fall off, exposing the bolts.
Bolt Caps are Filthy
You might notice that the caps are getting dirtier with time. So, it is necessary that you remove the caps and then install new ones.
You can easily clean the caps by using vinegar and other cleaning products. But if you cannot clean them easily or are unable to access them, it means that it is time to replace the caps.
Broken Bolt Caps
When bolt caps are broken, you will notice that they snap off the surface of the unit. This is a very important signal to know that it is time to change the caps.
Also read: How Tall Is A Toilet Paper Roll?
Essential Tools You Need to Remove Toilet Bolt Caps
You can easily remove toilet bolt caps using the most common household and garage items. Here are some things you need to remove worn toilet bolt caps and install new ones on toilets:
- A pair of gloves to protect your hands from getting dirty.
- Bucket to gather water and clean the bolt caps.
- Towel to collect water after you remove the old caps.
- A screwdriver or a knife to remove old caps.
- You may need to use a hacksaw to cut the bolts.
If necessary, you can use a standard hammer to hammer on the cap or on the inside of the cap to make it tight. It is recommended that you use baking soda and vinegar to clean the bolts before you attach the covers to them.
Also read: How to Fix Common Saniflo Toilet Problems
How Toilet Bolt Caps Are Installed
Here are detailed steps on how you can install toilet bolt caps:
- When you install a toilet, you install bolts into the flange to hold the toilet to the floor. Then, you install the toilet so that the bolts will touch the bottom of the toilet bowl.
- After that, you need to fix the toilet by screwing the nuts that hold the flange of the toilet down. Before you do that, you need to put the base of the toilet lid on the bolt that will allow you to insert a new cap.
- It is necessary to install the cap on a base that has a ridge around the perimeter, which is why it is necessary to install the cap on a base that has a ridge facing up. When you put on the cap base, a washer is added on top.
- Then, a nut is added to secure the cap down. This is where the actual cap will go, but if the bolt is too long, the cap won’t fit. You will have to cut the bolt to fit the cap.
- You then install the cap by fitting it on the plastic base and pushing it down until it snaps and locks in place.
- Now that you know how the cap is installed, you’ll easily understand how to take it off. And because it doesn’t have to be glued or screwed on, you can just use a flat edge to remove it.
Toilet Bolt Caps Removal Process in Six Easy Steps
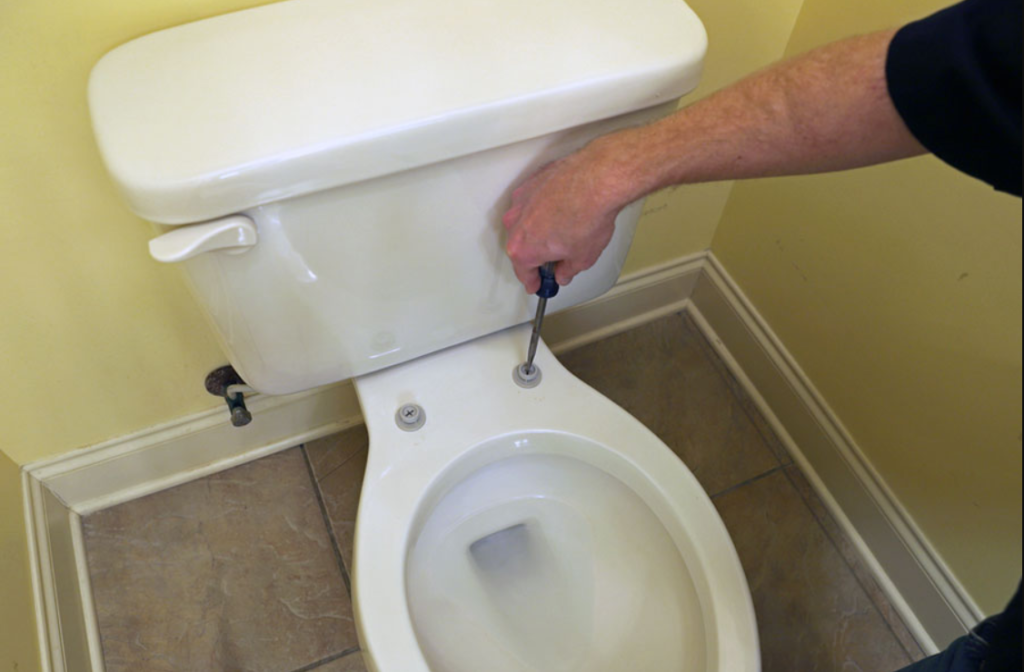
You will need a flat-edged tool to remove the cap. Using a flathead screwdriver and a long-handled metal knife, carefully pry and loosen the cap to take it off.
However, any sharp-edged metal kitchen knife or putty knife will still work. You can do that by slipping the blade of a sharp-edged utility knife under the cap and pushing it upwards.
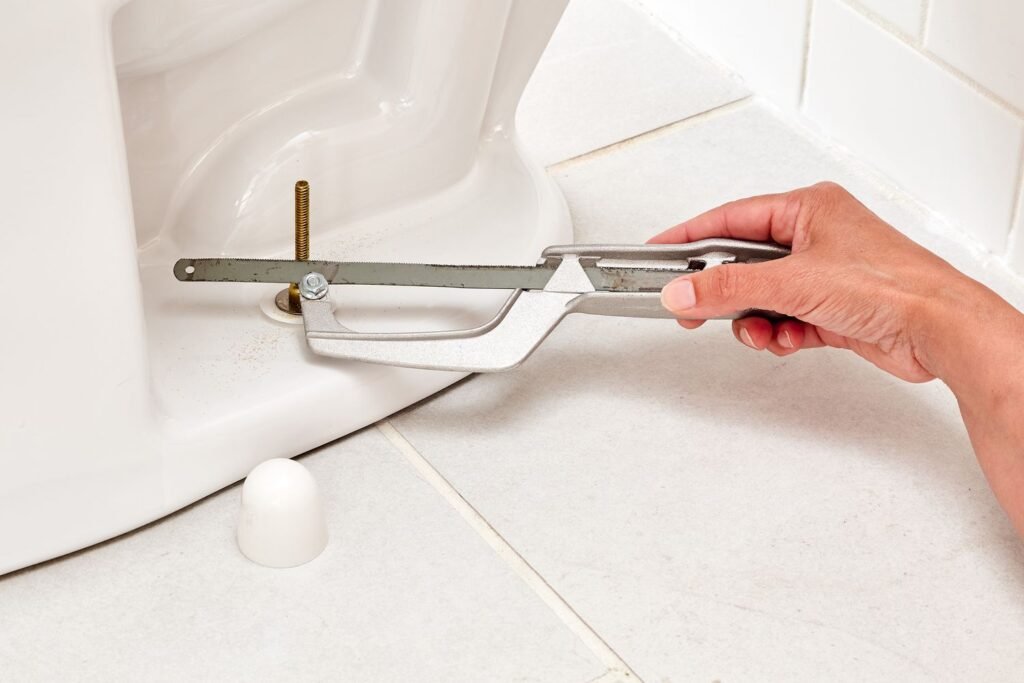
You can pry the cap off by working the blade around it and doing it several times. It will come off eventually.
In some cases, rust and hard water deposits may have welded the base of the cap to the toilet bowl, so prying it off won’t work.
You shouldn’t be afraid to cut off the cap easily with a utility knife if you have to because you can buy new caps cheaply and easily.
Also read: How to Remove Mold Around Your Bathroom Fan
Before you do that, try applying some lubricant to the base of the cap, and after you wait a few minutes, try again.
You can try spraying a little vinegar on the toilet bowl first, as it dissolves hard water faster than a good lubricant, and then wait about an hour before trying to remove the cap again. Here is how to remove stuck toilet bolt caps in six simple steps:
Step 1: Put Paper Towel Under the Bowl
First, place some paper towels under the toilet to prevent the tiles from getting dirty and keep the water from getting everywhere.
If there is a leak in the toilet base, the towel will catch any water that might leak and protect you and your work surface.
Step 2: Use the Proper Tools
Even though some people try to remove caps by using their hands, it would be better to utilize tools to help you remove them.
Being able to use a flathead screwdriver to loosen the cap is ideal, but having a sharp knife is also useful to cut off the top of the lid.
You can use a plane or a small metal screwdriver to easily remove the caps. You may also want to invest in a small hacksaw to cut the head off of the bolts if the bolts are too long.
Step 3. Slide Your Tool Behind the Bolt Cap
After you finish the above-mentioned work, you’ll need to hold the screwdriver tightly in your hand and push it slowly upwards underneath the cap. If the cap doesn’t come off, try slipping another tool underneath it.
Try to push from different angles and sideways to try to loosen the cap. If the cap still prevents you from prying into it, apply a little more force until it comes off.
If you try hard to remove the cap from the toilet and it stays stuck and doesn’t move, you should try to remove the cap using a sharp object, like a dagger or a hacksaw.
You can also use a hacksaw or a dull piece of wood, but be very careful while doing that, as you could cut yourself or destroy the nuts that hold the caps on.
Also read: Homemade Bathroom Cleaner Using Vinegar, Dawn, Baking Soda ( The DIY Guide)
Step 4: Remove the Toilet Bolts
When you take off the toilet caps, make sure that you also take out the safety nuts and bolts at the base of your toilet. In addition, check that all the bolts that support the toilet lid are free from any debris that could make it difficult to place new caps properly.
Vinegar and baking soda are normally available in every house. You can use it to clean not only the toilet bolts but also the base of your toilet. After that, pour some vinegar and baking soda into the toilet bowl and let it sit for about 15 minutes. After that, rinse the tub with warm water.
Step 5: Check the Height of the Bolts
Before you replace the bolt caps, check the size of the bolt head. Toilet bolts are usually available in large sizes, and the weight of the toilet may cause them to be taller than the caps.
In case you notice that the bolt is a little too tall, try cutting off a small chunk with a hacksaw. After doing it, you are all set to put the new caps on the bolts.
Also read: How to Install a Bathroom Sink Drain
Step 6: Install New Bolt Caps
After removing the old caps, you will need to fit new ones. When you install a new toilet, one of the final touches is to cover the flange bolts that hold the toilet to the floor with a nice-looking cap.
Caps protect bolts from corroding when the bathroom is damp.
Cap installation isn’t that difficult; it’s frustrating because often, the cap is too short to fit the bolt that holds the toilet in place. To fix that, the plumber will have to cut the washer or drill the hole to install the flange. Luckily, there’s a way to prevent that.
When installing a new toilet, here are the steps to follow:
- Set the toilet on the floor and secure it by screwing on flange bolts that fit into the holes in the base of the toilet.
- You can replace the bolts that came with your toilet by inserting them into the base of the toilet to hold it in place.
- Follow that with a rubber washer to secure the bolt to the toilet bowl. Screw on the washers that came with the toilet bolts.
- You need to screw one of the nuts that are supplied into the flanges of each toilet bolt and tighten it with a wrench.
- You can either cut the top of the bolt with a hacksaw or, if the bolt has an indent in the threads, break the cap off with pliers to expose the nuts.
- Then put the cap on the base and push it down until it snaps into place.
Also read: Is Flushing While Sitting on the Toilet Safe?
Dealing with A Rusty Toilet Bolt
Getting the toilet cap off is very challenging if you have a toilet that has rusty bolts.
If the bolts are rusted, just spray a little lubricant on them and then wait 10 minutes before trying to unscrew them with a wrench.
Some people often experience problems because the bolt spins along with the nut. In some cases, the nuts may be loose, too.
It is possible that the bolt won’t stop spinning even when you force it to do what is necessary by pushing the flange on the side of the toilet bowl with a screwdriver.
In some cases, you may have to cut the bolt off with a hacksaw to fix it.
You will have to remove one of the two parts that surround the toilet bowl: the cap itself and the bolt that holds the toilet bowl together. If you remove the old cap from the toilet, you will see that it is a round plastic that is a little more than an inch in height.
You wouldn’t be able to fix the cap to the toilet if that was all that came with the toilet. A toilet cap is usually supplied with a base to hold it, but you have to put the base on the toilet before you bolt it down.
Also read: Common Offset Toilet Flange Problems and their Solutions
It’s important to look at how the toilet cap and the base of the toilet sit together. Check out the base of the cap and note that it has a ridge on one side and is flat on the other.
When you insert the ridged end of the base into the cap, the two pieces should snap together.
Many people install the base of the toilet upside down or completely ignore it.
Sometimes toilets will have exposed bolts and caps that can hang awkwardly from a bolt. If that is the case, you may need to put the base in place before you install the nuts that secure the toilet.
Wrapping Up
The most challenging part of the installation is cutting the bolts that hold the toilet up. If you don’t use breakable bolts, you’ll have to cut them with a hacksaw.
It’s often very slow and labor-intensive to cut the bolts, and doing that may even scratch the toilet.
Fortunately, if you have an angle grinder, you can cut the bolts much faster, but if you accidentally slip and break the grinder, it can ruin your project.
Tall caps are often the perfect solution because they are easily cut. Plumbers complained to manufacturers, and they listened; they now have tall caps that cover long bolts.
These are usually shaped like a rectangular base that fits into a round hole in a toilet. Place the bases on the bolts first, like you would place a regular cap.
Tighten the nuts at the same time. Thankfully, the bases and caps on most toilets are threaded, so when you tighten the toilet bolts, all you have to do is screw the caps onto the base of the toilet.
Then the toilet will stay in place. Hopefully, this guide has helped you complete your DIY toilet bolt cap removal and replacement.
Feel free to share your experiences in the comment box below!
Also read: Are Toilet Lid Covers Sanitary? Debunking Myths
How do I remove stubborn toilet bolt caps?
To remove stubborn toilet bolt caps, use a flat-edged tool such as a screwdriver or knife. Slide the tool behind the cap and carefully pry upwards. If the cap is stuck due to rust or hard water deposits, applying lubricant or vinegar and waiting before attempting removal can be effective.
Why do I need to replace toilet bolt caps?
Toilet bolt caps should be replaced if they have disappeared, become damaged, accumulated dirt, or broken. Proper maintenance and timely replacement ensure the integrity of the toilet installation and prevent exposure of bolts that can lead to further issues.