Are you looking to upgrade your bathroom or tackle a pesky clog? Removing a bathroom sink stopper might seem like a daunting task, but fear not! Understanding the types of sink stoppers and the right removal techniques can make this process a breeze.
From the familiar pop-up stoppers to the twist-and-pull varieties, each stopper has its own unique removal method. But don’t worry, we’ve got you covered with this comprehensive guide.
Armed with the right tools, a bit of creativity, and some unconventional methods, we’ll walk you through step-by-step. Not only will you learn how to remove that stubborn stopper, but we’ll also share DIY solutions and maintenance tips to keep your sink running smoothly.
Safety first, of course! Let’s dive into this journey of sink stopper removal, unlocking the secrets to a clean and hassle-free bathroom sink.
Understanding the Types of Sink Stoppers
Before embarking on the task of removing the bathroom sink stopper, it is essential to recognize and understand the specific type of stopper in place.
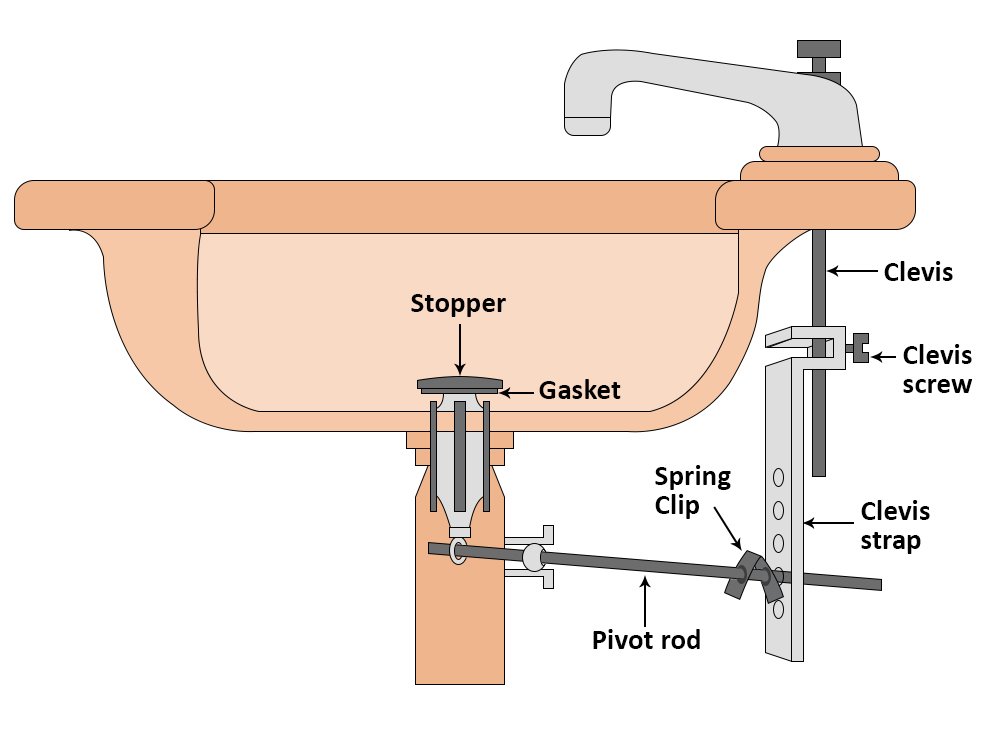
Primarily, there exist three common types: the pop-up, lift-and-turn, and push-and-pull stoppers. With each variant possessing a distinct operational mechanism, the removal process varies accordingly.
The most prevalent form of sink stoppers is the pop-up stopper, featuring a knob or lever on the faucet to regulate the stopper’s operation. They are commonly found in many households’ sinks and are convenient to use due to their simple yet efficient design.
Whether you’re washing your hands or doing the dishes, these stoppers are essential in maintaining a functional and hygienic sink.
Similar in function to pop-up stoppers, lift-and-turn stoppers feature a distinct twistable knob on the upper part, which serves as a locking mechanism for securing or releasing the stopper. This design enhances the engagement of the user with the stopper’s operation, adding an element of interactivity and ease of use.
Push-and-pull stoppers resemble pop-up stoppers, featuring a knob atop the stopper for opening or closing it. They are akin to a ride – twisting and turning.
Necessary Tools and Materials
To remove your bathroom sink stopper, you will need some basic tools and materials that you can easily find in your home. Here is a list of what you will need and why:
- Pair of Pliers
- A Screwdriver
- A Wrench
- A Bucket
- A Rag
- A Wire Coat Hanger
- A Rubber Band.
Step-by-Step Removal Process
Got your sink stopper type figured out? Gathered all the needed tools and materials? Great! You’re all set to take out your bathroom sink stopper. Follow these steps, and check out these different options and handy tips for various scenarios:
Clear Out the Sink and It’s Underside: Get your sink ready first. Ensure the sink’s void and neat. Take out anything that might be there, like soap, toothbrushes, cups, or towels. Make sure the area under the sink, your working spot, is clean too.
Turn Off the Water Flow: To prevent dripping or flooding, it’s important to stop the water flow to the tap. Here’s how: figure out where the valves are positioned below the sink and twirl them clockwise until they’re firmly fixed. Not seeing the valves or can’t access them? No worries! Simply turn off your house’s main water supply;
Set the Bucket Beneath the Drain: This bucket will serve as receptacle for any liquid or foreign object which may spill when the stopper is taken off. Confirm the bucket can accommodate the volume of water and that it is in close proximity to the drain pipe.
Remove the Knob or Lever From the Stopper: Depending on the type of sink stopper you have, you need to remove the knob or lever from the stopper. For a pop-up stopper, you need to unscrew the knob or lever from the faucet and pull it out.
For a lift-and-turn or a push-and-pull stopper, you need to unscrew the knob from the top of the stopper and pull it out. You can use the pliers or the screwdriver to help you with this step.
Unhook the Bar From the Drain Channel: Beneath the basin, there’s a bar. It connects the handle or switch to the stopper. This bar is fastened to a waste pipe with a fastener or a bracket. The task is to detach the bar from the waste pipe. You’ll do this by slackening the fastener or bracket. To aid in this step, you can utilize a wrench or pliers.
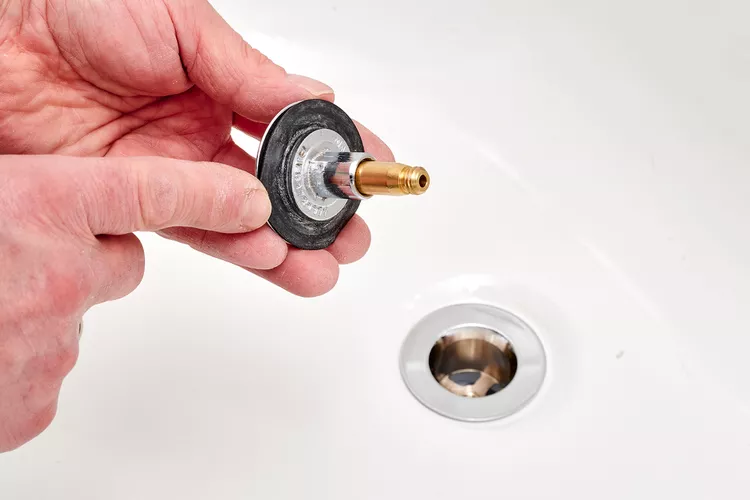
Pull the Plug From the Drain: Having detached the rod from the drain pipe, it’s now possible to extract the plug. Achieve this by hoisting the plug via the rod or the knob, hinging on the plug’s style. If the stopper is stuck or hard to reach. Use the wire coat hanger to help you with this step. You can do this by bending the hanger into a hook shape and inserting it into the drain.
Clean the Stopper and the Drain: After pulling the stopper from the sink, it requires a proper clean. Do this by clearing any lingering mess or muck, like grease or grime, from the plug and the sink. Use a cloth for this. Try soap and water or even a mix of vinegar and baking soda for an extra helping hand.
DIY Solutions
Some possible creative DIY solutions and hacks for crafting makeshift tools that aid in the removal process are:
Suppose you’re without a wrench or pliers. No worries! You can grab a hair tie or a rubber band! Wrap it around that hard-to-turn nut or screw. Then, just twist with your fingers. Simple as that! You’ll have more gripping power to either loosen or tighten. It really is as easy as it sounds.
No flat-head screwdriver? No problem! A butter knife or a coin can work, too, to pry the spring clip or screw. This can let you take the stopper out from the drain. It also does the job for the ball-and-rod mechanism.
If you do not have a wire coat hanger or a metal skewer, you can use a plastic straw or a chopstick to poke or pull out any clogs or obstructions the drain. This will help you to clear the drain and improve the water flow.
Safety Precautions
Some safety considerations to keep in mind while removing a bathroom sink stopper are:
- Wear gloves and goggles to protect your hands and eyes from any dirt, grease, or sharp edges. You might also want to wear a mask to avoid inhaling any dust or odors.
- Turn off the power supply to the bathroom if you have any electrical outlets or devices near the sink. This will prevent any electric shocks or fires from happening while you work.
- Be gentle and careful when handling the tools and materials. Do not force or hammer anything that might break or damage the pipes or the sink. Do not cut or trim anything that might cause leaks or floods.
- Dispose of any waste or debris properly. Do not flush or dump anything that might clog or contaminate the drain or the sewer system. Recycle or reuse anything that might be useful or valuable.
Also read: Can a Toilet and Sink Share the Same Drain
Aftercare and Maintenance
To maintain a clean and functional sink drainage system, you should follow these tips:
- Clean the stopper and the drain hole regularly to prevent clogs and odors. You can use a mixture of baking soda and vinegar to dissolve any buildup in the drain.
- Avoid pouring grease, oil, or other substances that can harden or stick to the drain pipes. Dispose of these materials in a trash can or a compost bin instead.
- Use a drain cover or a mesh screen to catch any hair, food particles, or other objects that may fall into the drain.
- If you notice any leaks, drips, or noises from the sink faucet or the drain pipes, contact a plumber as soon as possible to fix the problem.
Read next: Mushroom Growing in Sink Drains: How to Fix the Problem