Is your daily shower experience being dampened by stubborn, malfunctioning shower knobs? Do you notice signs of wear and tear on those essential bathroom components? It might be time for a change. Fear not, for we’ve got you covered with this comprehensive guide on how to replace your shower knobs.
To replace your shower knobs, start by assessing the condition of your existing knobs; if they show signs of wear, corrosion, or difficulty turning, it’s time for a change. Turn off the water supply to your bathroom to ensure safety.
Remove any decorative caps or covers concealing screws, then access and unscrew the faceplate or trim to expose the mounting screws. Loosen and remove the set screw holding the old knobs and handles in place, and gently detach them from the valve stem.
Next, select suitable replacement knobs and handles, slide them onto the valve stem, and secure them with the set screws or mounting mechanisms.
Reattach the faceplate or trim, turn on the water supply, and test the knobs for proper functionality and leaks. Make any necessary adjustments for optimal performance, and you’ve successfully replaced your shower knobs!
Importance of Functional Shower Knobs
Shower knobs are more than just functional components; they’re integral to your daily routine.
Properly functioning knobs ensure you can easily control the water temperature, pressure, and direction, allowing for a comfortable and refreshing shower.
Over time, however, they can wear out, become difficult to turn, or even start leaking. Replacing them in a timely manner is essential to maintain an efficient and enjoyable showering experience.
Identifying Signs for Replacement
Before diving into replacement, you need to evaluate the condition of your existing shower knobs. Signs of wear and tear, corrosion, rust, difficult turning, or visible damage are clear indicators that it’s time for a change. Additionally, if you’re renovating your bathroom and aiming for a fresh, updated look, replacing the knobs is a sensible choice.
Types of Shower Knobs and Their Mechanisms
Understanding the type of shower knobs you have is crucial for a successful replacement. Knobs can be of various types, including single-knob, double-knob, or even triple-knob setups.
Each type has a different mechanism and installation process. Knowing what you’re dealing with will guide you in selecting appropriate replacement knobs and undertaking the replacement process.
Gathering the Necessary Tools and Materials
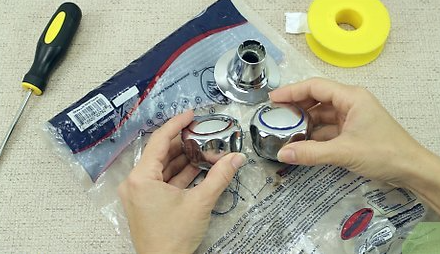
For a smooth replacement process, you’ll need a set of tools and materials. These typically include a screwdriver (Phillips or flat-head, depending on the screws), pliers, an adjustable wrench, and the replacement knobs. Make sure to choose knobs that match the existing setup and fit well with your bathroom decor.
Steps On How to Replace Shower Knobs
Turn Off Water Supply and Ensuring Safety
Begin by ensuring your safety and preventing any potential water damage. Locate the main water supply to your bathroom and shut it off.
It’s often a good idea to inform other household members about the maintenance work to avoid any unexpected use of water during the replacement.
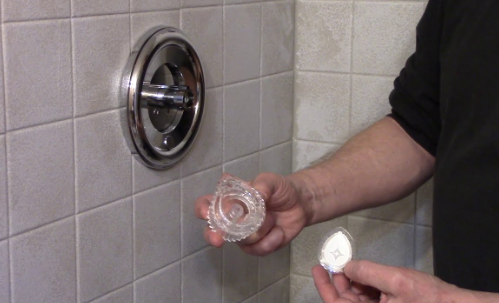
Remove any Decorative Caps or Covers
Shower knobs often have decorative caps or covers that conceal screws. Gently remove these caps using a flat-head screwdriver. Set them aside safely, as you’ll need to reattach them later.
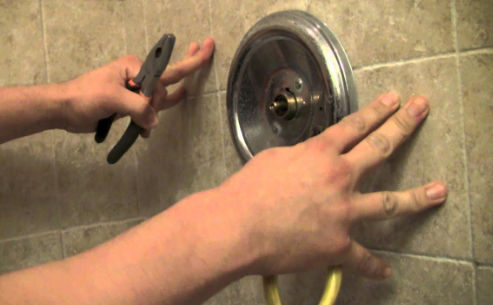
Access the Screws or Mounting Mechanism
Once the caps are off, you’ll find screws or other mounting mechanisms that hold the knobs in place. Depending on the type of knobs you have, these may be visible or concealed beneath a faceplate. Carefully examine and locate these mounting mechanisms as you prepare for the next steps.
Remove the Old Shower Knobs
- Unscrew or Detach the Faceplate or Trim: In many shower knobs, a faceplate or trim covers the screws and provides an aesthetic touch. Unscrew or detach this faceplate carefully to expose the screws or mounting mechanism that holds the knob in place. Use your screwdriver for this step.
- Loosen the Set Screw or Screw Securing the Knob: Once the screws or mounting mechanisms are exposed, it’s time to loosen them. Most knobs have a set screw or a central screw that holds the knob onto the valve stem. Use your appropriate screwdriver to carefully loosen and remove this screw.
- Detach the Knob and Handle from the Valve Stem: Once the screw is removed, you should be able to pull the knob and handle off the valve stem. This might require a bit of gentle force. Be careful not to damage the valve stem during this process. Set aside the old knobs and handles.
Choosing and Installing New Shower Knobs
- Select Suitable Replacement Knobs and Handles: Choosing the right replacement knobs and handles is crucial for a seamless installation. Consider the type, design, and material of the knobs. Ensure they match the existing setup and fit well in your hand for comfortable use. Take note of any specific instructions that come with your replacement knobs.
- Attach the New Knobs and Handles to the Valve Stem: Now, it’s time to attach the new knobs and handles. Slide them onto the valve stem, ensuring they align correctly. Depending on the replacement knobs you’ve chosen, they may have a specific orientation or alignment for proper functionality.
- Secure the Knobs and Handles in Place: Once the knobs and handles are in the correct position, secure them tightly using the set screws or mounting mechanisms. Tighten them until the knobs are firmly in place, and there’s no wobbling or movement. Check the knobs to ensure they turn smoothly and control the water flow and temperature effectively.
Reassembling and Testing
- Reattach the Faceplate or Trim: Carefully reattach the faceplate or trim that covers the mounting mechanisms and screws. Align it properly and use the screws you initially removed to secure it in place. Make sure it’s snug and aligned with the knobs for a neat finish.
- Test the Knobs for Proper Functionality and Leaks: With the replacement complete, it’s time for a crucial step—testing. Turn on the water supply to the bathroom and test the knobs. Check if they control the water flow and temperature smoothly. Look for any leaks or drips around the knobs. If everything functions correctly, you’ve successfully replaced your shower knobs!
Making Necessary Adjustments for Optimal Performance
During testing, if you notice any issues like leaks or difficulty in turning the knobs, you might need to make some adjustments. Ensure all screws are tightly secured, and the knobs are aligned correctly. If problems persist, double-check the installation steps and seek professional assistance if needed.
Tips for a Successful Replacement
- Proper Maintenance for Extended Knob Life: To extend the life of your newly replaced knobs, practice regular maintenance. Clean them regularly to prevent the buildup of soap scum or mineral deposits. Lubricate any moving parts with appropriate lubricants to ensure smooth operation.
- Potential Challenges and How to Overcome Them: While replacing shower knobs is a relatively straightforward process, you may encounter challenges such as stubborn screws, corroded parts, or difficulty in accessing certain components. Patience and the right tools can help overcome these challenges. Use penetrating oil for rusted screws and take your time to carefully navigate tricky situations.
When to Seek Professional Help for Shower Knob Replacement
If you’re uncomfortable with any step of the replacement process or encounter complex issues, don’t hesitate to seek professional help. A plumber or a handyman with experience in plumbing can efficiently replace your shower knobs, ensuring proper installation and functionality.
Conclusion
Congratulations! You’ve successfully replaced your shower knobs, enhancing the functionality and aesthetics of your bathroom.
Regular maintenance and timely replacements ensure your shower remains a haven of comfort and relaxation. With this guide, you’re now equipped to tackle future replacements and upkeep with confidence. Enjoy your rejuvenated showering experience!