If you’re looking to add a bathroom or plumbing fixture in a space where conventional plumbing is challenging, a Saniflo toilet could be your solution.
Saniflo toilets are known for their versatility, allowing you to install toilets, sinks, and even showers in locations with limited access to traditional sewage lines. If you’re searching for tips on how to install a Saniflo toilet, this guide is just for you.
Installing a Saniflo toilet involves several key steps. First, ensure that you have the right Saniflo model for your needs and follow the manufacturer’s installation guidelines carefully.
Start by positioning the toilet and macerator pump unit, connecting the toilet bowl outlet to the macerator unit, and attaching the toilet tank. Next, connect the macerator unit to the discharge pipe, ensuring proper alignment and a secure fit.
Electrical connections may be necessary, so consult the manufacturer’s instructions for wiring details. Once everything is in place, perform a water test to check for leaks or issues.
Regular maintenance, including cleaning and inspection, is essential for the ongoing performance of your Saniflo toilet, so be sure to follow recommended maintenance schedules.
If you’re uncertain about any aspect of the installation, it’s advisable to seek professional plumbing assistance to ensure a reliable and trouble-free setup.
Why Install A Saniflo Toilet?
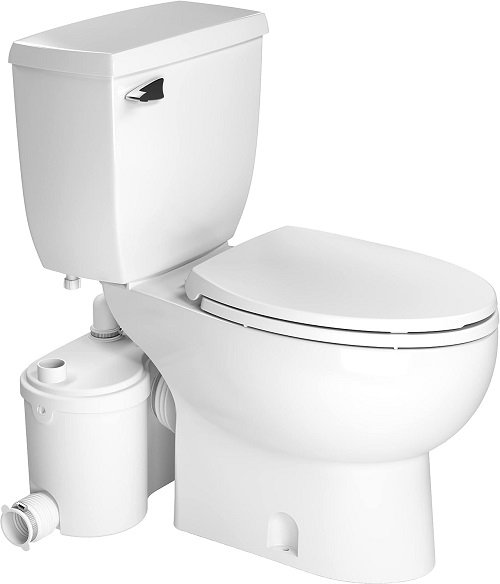
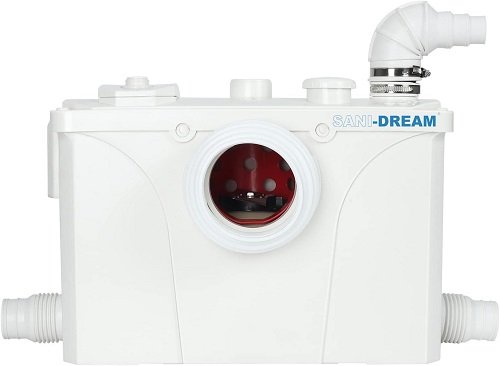
Saniflo toilets are a type of macerating toilet system. Unlike traditional toilets that rely on gravity to move waste through pipes, Saniflo toilets use a macerator to grind waste into a fine slurry. This slurry is then pumped through small-diameter pipes to reach the main sewage line or septic tank.
Below are the benefits of installing a Saniflo toilet:
- Versatility: Saniflo toilets can be installed virtually anywhere, including basements, attics, and even under staircases, thanks to their ability to pump waste both vertically and horizontally.
- Space-Saving: These toilets are excellent for small spaces where conventional plumbing would be impractical.
- Easy Installation: While the installation may seem intimidating, it’s a manageable DIY project for those with basic plumbing skills.
- Cost-Effective: Saniflo systems are often more cost-effective than extensive renovations to accommodate traditional plumbing.
Now that you understand the benefits let’s move on to the installation process.
Tools and Materials
Before you begin installing your Saniflo toilet, gather the necessary tools and materials. Having everything ready will make the process smoother. Here’s what you’ll need:
Tools:
- Adjustable wrench
- Hacksaw
- Screwdrivers (Phillips and flathead)
- Pipe cutter
- Plumber’s tape
- Plumber’s putty
- Safety goggles
- Work gloves
- Pencil and tape measure
- Level
Materials:
- Saniflo toilet kit (which includes the toilet bowl, tank, macerator pump, and seat)
- PVC pipes and fittings (check the Saniflo system’s requirements for specific sizes)
- PVC solvent cement
- Saniflo toilet seal
With your tools and materials in hand, you’re ready to start the installation process.
Pre-Installation Preparation
Before you begin installing your Saniflo toilet, there are some essential pre-installation preparations to consider:
- Select the Location: Choose the location for your Saniflo toilet carefully. Ensure it’s close to both a water supply and an electrical outlet. Consider the plumbing and electrical requirements of your specific model.
- Check Local Building Codes: Research and understand the local building codes and regulations in your area. Compliance is crucial to avoid any legal or safety issues down the line.
- Plan Your Plumbing: Plan the layout of your plumbing connections, including where the macerator pump will be located, where the waste will be discharged, and where the water supply lines will connect.
- Prepare the Floor: Ensure the floor is level and stable. If it’s not level, use shims to make necessary adjustments.
- Install an Electrical Outlet: If your chosen location doesn’t have an electrical outlet, hire an electrician to install one. Saniflo toilets require a dedicated GFCI (Ground Fault Circuit Interrupter) electrical circuit.
Installation Steps
Now that you’ve prepared everything, let’s dive into the step-by-step installation process for your Saniflo toilet:
Step 1: Assemble the Macerator Pump
- Place the macerator pump on a sturdy, flat surface close to the toilet’s location.
- Install the rubber gaskets on the inlet and discharge ports of the macerator pump.
- Connect the discharge pipe to the discharge port and secure it with hose clamps.
- Attach the discharge elbow to the discharge pipe.
Step 2: Connect the Water Supply
- Locate the water supply line in your bathroom.
- Shut off the water supply to the bathroom and drain the pipes.
- Cut the water supply line where you want to install the toilet.
- Install a T-fitting and connect the supply line to it.
- Connect a new water line to the T-fitting’s open end.
- Turn on the water supply to test for leaks.
Step 3: Install the Toilet Bowl and Tank
- Position the toilet bowl in the desired location.
- Ensure the toilet bowl is level, using a level if necessary.
- Mark the positions of the mounting holes on the floor.
- Drill pilot holes for the anchor bolts and then secure the toilet bowl to the floor using these bolts.
- Attach the tank to the bowl, following the manufacturer’s instructions.
Step 4: Connect the Macerator Pump
- Position the macerator pump so that it aligns with the toilet’s discharge outlet.
- Connect the discharge elbow to the toilet’s discharge outlet.
- Secure the macerator pump to the floor using mounting brackets or straps.
Step 5: Connect the Waste Line
- Measure and cut a section of PVC pipe to connect the discharge elbow to the main sewage line or septic tank.
- Use PVC solvent cement to secure the pipe connections.
- Ensure that the waste line has the proper slope for effective drainage.
Step 6: Install the Vent Pipe (if required)
- In some cases, a vent pipe may be necessary to ensure proper airflow in the drainage system.
- Measure and cut a section of PVC pipe to create the vent.
- Connect the vent pipe to the venting port on the macerator pump and extend it to the outdoors or an existing vent stack.
Step 7: Secure the Toilet Tank and Seat
- Attach the tank to the bowl following the manufacturer’s instructions.
- Install the toilet seat according to the provided guidelines.
Step 8: Test Your Saniflo Toilet
- Turn on the electrical circuit dedicated to the Saniflo system.
- Flush the toilet and listen for any unusual noises or vibrations.
- Monitor the wastewater discharge to ensure it flows freely.
- Check for any leaks in the water supply or waste connections.
Step 9: Finish and Seal
- Seal the base of the toilet with a Saniflo toilet seal or a wax ring to prevent any odors or leaks.
- Install the toilet’s trim and covers.
Testing and Troubleshooting
After you’ve completed the installation, it’s crucial to test your Saniflo toilet to ensure it’s functioning correctly. Here’s how to do it:
- Flush Test: Flush the toilet several times to make sure waste and water are efficiently macerated and pumped away.
- Inspect for Leaks: Check all connections for any signs of water or waste leakage.
- Listen for Unusual Noises: Pay attention to any unusual noises during the flushing process. If you hear grinding or vibrating sounds, there might be an issue with the macerator.
- Check for Proper Drainage: Ensure that waste is properly draining into the sewage or septic system without backing up.
- Test the Ventilation: If you’ve installed a vent pipe, confirm that it’s allowing for proper ventilation by observing the toilet’s flushing performance.
- If you encounter any issues during the testing phase, refer to the troubleshooting section in your Saniflo user manual or contact Saniflo’s customer support for guidance.
Saniflo Maintenance and Care
To keep your Saniflo toilet in optimal condition, follow these maintenance tips:
- Regular Cleaning: Clean the toilet bowl and tank as you would with any standard toilet.
- Inspect Connections: Periodically check all connections for signs of leaks or loose fittings.
- Avoid Harsh Chemicals: Use toilet cleaning products that are compatible with macerating systems to prevent damage to the pump and pipes.
- Annual Inspection: Consider an annual inspection by a professional plumber to ensure everything is functioning correctly.
- Maintain the Vent: If you’ve installed a vent pipe, make sure it remains unobstructed to ensure proper airflow.

Frequently Asked Questions (FAQs)
Here are answers to some common questions about Saniflo toilets:
Q1: Can I install a Saniflo toilet in my basement?
Yes, Saniflo toilets are ideal for basement installations since they can pump waste both vertically and horizontally.
Q2: Do I need a vent pipe for my Saniflo toilet?
In some cases, a vent pipe is necessary to ensure proper airflow. Check the manufacturer’s recommendations for your specific model.
Q3: Can I use regular toilet cleaning products with a Saniflo toilet?
It’s best to use cleaning products that are compatible with macerating systems to prevent damage to the pump and pipes.
Q4: How long does a Saniflo toilet typically last?
With proper maintenance, a Saniflo toilet can last for many years. Some homeowners have reported 10-15 years of trouble-free use.
Conclusion
Congratulations! You’ve successfully installed a Saniflo toilet, expanding the possibilities for plumbing in your home.
By following the step-by-step instructions and considering the benefits and considerations of these systems, you’ve tackled a potentially daunting project with confidence.
Remember that while the installation may seem complex, it’s entirely manageable for those with basic plumbing skills.
Regular maintenance and care will keep your Saniflo toilet operating smoothly for years to come, offering the convenience and versatility you need in your home. Enjoy your newly installed Saniflo toilet!